Step 5: Initial Robot Architecture
Introduction
After prioritizing your robot's capabilities in Step 4, it's time to organize those capabilities into a conceptual robot architecture. This is not detailed CAD - it's a high-level plan that defines your major subsystems, how they'll fit together, and what constraints you need to consider.
The goal: Create a roadmap for prototyping that ensures your mechanisms will actually fit together on a real robot.
This is initial architecture based on your priorities. It will evolve during prototyping as you learn what works and what doesn't. Expect to revise this!
What is Robot Architecture?
Robot architecture is the high-level organization of your robot's subsystems and how they relate to each other. Think of it as the "floor plan" of your robot before you know all the details.
Architecture defines:
- Major subsystems and their purposes
- Rough physical layout and packaging
- How subsystems interact and hand off game pieces
- Spatial constraints and available volume
- Weight distribution considerations
Architecture does NOT define:
- Specific mechanism designs (that's for prototyping)
- Exact dimensions and CAD details
- Software design
Step 1: Define Major Subsystems
Based on your "Must Have" priorities from Step 4, identify the major subsystems your robot will need.
Common FRC Subsystems:
Swerve Drivetrain
- The foundation of every robot
- Swerve, West Coast Drive, Mecanum, etc.
- Always consider drivetrain height and frame perimeter
Game Piece Manipulation
- Intake - Acquires game pieces from the field
- Indexer - Stores and positions game pieces inside the robot
- Shooter/Scorer - Scores game pieces into goals
- Linear Extensions - Raise the game pieces
Endgame Mechanisms
- Climber - Hangs or climbs on structures
- Stage mechanism - Parks or positions for endgame bonuses
Supporting Systems
- Bumpers - Required for all robots
- Electronics - Battery, controllers, motors
Your Subsystem List:
Create a simple list of your robot's major subsystems:
Example for a hypothetical game:
- Swerve drivetrain
- Front-mounted floor intake
- Internal indexer (stores 3 game pieces)
- Fixed-angle shooter
- Telescoping climber (rear-mounted)
Key Questions:
- What does each subsystem do?
- Which subsystems are "Must Have" vs. "Nice to Have"?
- Roughly where will these go on the robot?
- How big can it be?
Step 2: Sketch Rough Layouts
Now sketch how these subsystems will be arranged on the robot. This doesn't need to be precise - use simple boxes and arrows.
Your sketch should include:
- Subsystem placement - Show where each major subsystem will be located on the robot
- Game element flow - Draw arrows showing how game pieces move between subsystems (intake → indexer → scorer, etc.)
This visual representation helps identify integration challenges and ensures all subsystems can work together effectively.
Example Layout Sketch:
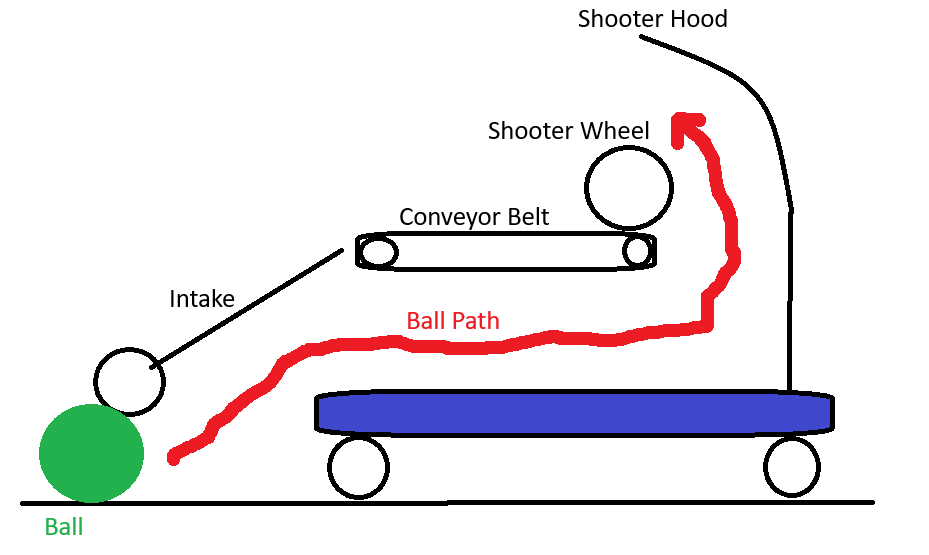
Figure: Example robot architecture layout showing subsystem placement and game piece flow
Step 3: Create Subsystem Specifications
For each major subsystem, define its requirements and constraints. This guides prototyping.
Subsystem Specification Template:
Subsystem Name:
Purpose:
Key Requirements:
Size Envelope:
Weight Budget:
Interfaces:
Design Constraints:
Prototyping Priority:
Example: Floor Intake
Subsystem Name: Floor Intake
Purpose: Acquire game pieces from the floor quickly and reliably
Key Requirements:
- Pick up game pieces in <1 second
- Work at any approach angle (±30 degrees)
- Intake width: 18-24 inches
- Deploy/retract to stay within frame perimeter
Size Envelope:
- Width: 24" max
- Depth: 12" when retracted, 20" when deployed
- Height: 6" ground clearance to 14" above ground
Weight Budget: 10-12 lbs including motors and mounting
Interfaces:
- Hands off to indexer at ~16" height, centered on robot
Design Constraints:
- Must clear bumpers when retracted
- Cannot interfere with drivetrain
- Must survive being driven over game pieces
Prototyping Priority: HIGH - Must prototype first (critical for scoring cycles)
Moving Forward to Prototyping
With your initial robot architecture complete, you're now ready to begin Phase 2: Prototyping!
Important Reminders:
Stay Flexible - As you prototype and learn more about what works and what doesn't, your requirements and overall layout will change. That's expected as you learn more!
Think of Alternatives - Always keep backup ideas in mind:
- Have simpler fallback options if complex mechanisms don't work
- Brainstorm multiple approaches to solving the same problem
- Don't get locked into your first idea - be creative!
Follow Your Priority List - While staying flexible, always refer back to your Step 4 priorities:
- Focus prototyping efforts on "Must Have" capabilities first
- Don't get distracted by "Nice to Have" features during early prototyping
- Make trade-offs that preserve your highest priorities
- If you must cut scope, cut from the bottom of the priority list